![]() We all know the power of photography and the importance of telling the district’s story. What image comes
We all know the power of photography and the importance of telling the district’s story. What image comes
 to mind when you think of your schools? We have a few tips to help! #photography
As communicators, we must be able to tell the school districts’ stories as effectively as possible.
Here are a few photography basics to get you started:
About > Of: Photographer James Pepsis recommends making a photo about something rather than of something. The concept captures the difference between taking a quick picture and demands that we think about what we are trying to say with a photo. For example, does the image tell a story or capture emotion? Is it a student looking like they are posing for a mug shot, or is it a student or staff member winning an achievement?
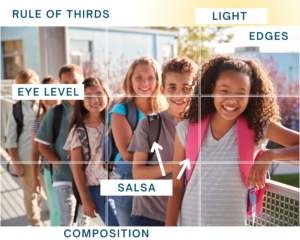
Lighting: We have all tried to take photos in a dark restaurant or backlit at sunset, and the pictures do not turn out. Find your light, feel the light on your face, know where it is coming from, and make sure you or the subject are in it. The Golden Hour, or the hour during sunrise and sunset, provides excellent soft light for pictures outside. A slightly overcast day can provide the same effect. Avoid overhead light, especially fluorescent light; it is just homophobic.
Eye Level: Get down to eye level of the student, subject, or object. By doing so, there will be more connection in the picture. We have all seen the photos of students looking up at the camera or towering over students from behind, creating tension in the image.
Angles: Rather than have the student or subject move (or the zoom feature), think about how you can change positions. For example, take a step closer, to the left, or shift down to get better angles and create more connection with the subject in the photo.
Composition: Consider The Rule of Thirds, which is a practice of dividing what is in the frame into thirds horizontally and vertically. Are you all familiar with the grid that shows up when you take pictures or crop a photo? (Pro Tip: You can turn this setting on in your phone). The key elements should fall on these gridlines to make a better overall composition, and help you avoid taking crooked photos.
Add Elements: What elements can improve a picture? Perhaps a backpack, a student holding a pencil, or a group of kids raising their hands? Or maybe the district needs to show transportation, rather than just a picture of a bus; how can you involve a driver, students, or the school in the background?
Edges: What do the edges or sides of the photo include? How can you add or remove elements from the frame of the photo? The bus example is great because we only need to see part of the bus to know it is a bus.
Photograph through something: Photographer Peter McKinnon suggests placing your fingers slightly over the camera to provide depth to the photo. Such as using foliage, markers, or maybe a roll of cardboard to give a different dimension to an image.
Timing: How can you be ready to take the picture? After considering the story you are trying to tell, the lighting and angles, and the overall composition, be prepared to snap the photo. For example, the camera is ready for kids getting off the bus, walking up the school stairs, or running into the frame at a game.

Video: Take a video. Video gives two options: one, the ability to go back to screenshot the video for a photo, and two, diversified content. Social media is pushing for more videos. Different formats can give creative space for boomerangs, Instagram stories, reels, and TikTok.
Practice, practice, practice: Set a schedule for fifteen minutes weekly to take photos of subjects or objects around the classroom or school. Do it with a coworker. Consider artist dates, coined by Julia Cameron in “The Artist’s Way .”These are little creative ‘dates’ for yourself (think inner child play), like spending time at a fabric shop, going to a museum, or researching photographers. Spark that inner creativity!
Students and teens: Everyone wants to see the photos they are in, but chances are you will need to sort through 100 pictures to find five good ones. With all of us having some insecurities about how we look in pictures, think about the photos you are showing or hold off until you can edit.

Resources:
- Cox, Spencer. (2022). Photography Tips for Beginners. Photography Life. https://photographylife.com/photography-tips-for-beginners
- McKinnon, Peter. (2016, December 23). 5 tips to INSTANTLY up your PHOTO GAME. Youtube. https://www.youtube.com/watch?v=Cb5bjlnDkCs
- Northrup, Chelsea; Northrup, Tony. (2013, August 2): How to Photography Kids, Babies, and Children: A Portrait Tutorial. Youtube. https://www.youtube.com/watch?v=xRx5nX6sXqo&t=1030s
- Popsys, James. (2020, March 19). My BEST Photography Tips for Intermediate/Advanced Photographers. Youtube. https://www.youtube.com/watch?v=FffEPQqGDPc
- Rowse, Darren. Rule of Thirds in Photography: The Essential Guide. Digital Photography School. https://digital-photography-school.com/rule-of-thirds/